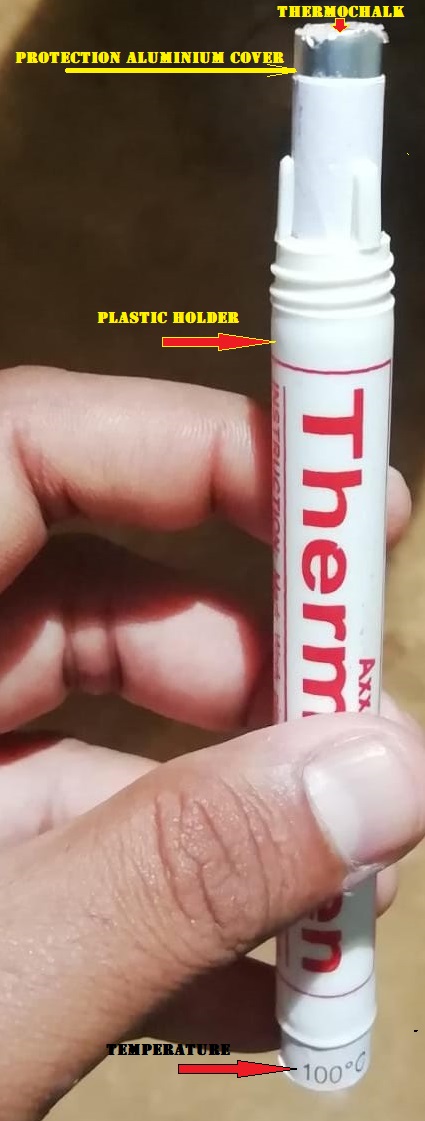
Temperature checking is one of the important activities of a welding process. Temperature of the portable welding electrode quiver, Interpass temperature, preheat temperature are some of the temperature measures one has to do on a day-to-day basis. These temperatures are checked frequently and done by welders.
There are many temperature measuring methods available such as thermocouples, contactless temperature measuring devices etc. But for a regular and continuous use, for a welder and quality control engineer, these are all becomes difficult in handling and usage.
To avoid these difficulties, the cheap and effective method is to use a themochalk. Thermochalk is also known as temperature crayons, thermostick and in many brand names. Thermochalks indicate surface temperature by changing from a chalk mark into a liquid smear.
Thermochalk is the simplest means of temperature checking, particularly for welders. Thermochalk is basically a Go-NoGo gauge and it cannot measure the exact temperature. Thermochalk can only be used to assess whether the surface is above or below the temperature mentioned in it. Thermochalks are available in different temperatures.
Some of the uses of thermochalk are,
- to verify the temperature of portable quivers
- to verify the preheat temperature
- to check the interpass temperature
- Verify the temperature of heating / electrical components
How to verify the temperature of a Thermochalk?
Thermochalks are not available with a test certificate. So verifying the temperature written in a thermochalk is done with a calibrated temperature gun / or other portable temperature checking method.
The verification process is as below.
1. Heat a metal surface below the temperature of a thermochalk. The temperature of the surface can be verified using temperature gun.
2. Mark the surface with the thermochalk. If the marking is visible go to the next step. If not the temperature written in the thermochalk is wrong.
3. Heat the surface again such that the surface temperature is above the temperature of the thermochalk. Measure the temperature using temperature gun.
4. Mark the surface with the thermochalk. If the marking becomes a liquid smear then we can confirm that the thermochalk is showing the correct temperature.If not the temperature written in the thermochalk is wrong.
There is no need to check the temperature of each thermochalk. one from a pack (of same tempreature) will be enough.
Most of the thermochalk manufacturing companies are assuring that their product will verify the temprature within 士1% accuracy.
How to use it?
- Most of the thermochalks are coming in plastic holders with a cap which can be clipped to our pocket like a pen.
- Remove the cap (may be threaded) from the plastic holder.
- Take the thermochalk slightly out of the plastic container and re-tighten the cap. Now the thermochalk will protrude from the end of the cap.
- Remove the aluminium foil from the protruding end of thermochalk.
- Apply the thermochalk on the surface.
- If the use of thermochalk is over, remove the cap and push the thermochalk inside the plastic container and re-tighten the cap.
- The thermochalks are very brittle, so when taken out of the plastic holder. handle it carefully other wise it may break.
This blog is not recommending any brand. The photos are taken for the better understanding for the readers. Usage of the products are to be done after technical assessment and at your risk and cost.
Disclaimer: Photos are taken from different websites. If this violates any copyright rules this will be removed. Please inform me if any of the photos or contents violate copyright rules. (through 13hareesh13@gmail.com). This blog is meant for educational purposes only. If it is used for any other means without the written consent from the author, the author will not be responsible. The author does not guarantee the accuracy of the data used in this blog. All the information, data, photo/image, calculations presented in this blog should be used at the sole risk of the user. The blogger is not liable or responsible in any way for any damage, losses or costs arising from the use of the blog for any purpose whatsoever or whosoever it may be. The blog is to be used at your sole risk and responsibility.


Very basic and important information!
ReplyDelete